Watch it on
YouTube
In this video, we will walk you step by step through "How to create a free landing page for real estate campaigns", We will be using "Released units" free landing page builder.
It is a simple process with a user-friendly control panel, you will not find such an easier landing page builder anywhere online.
If you want to step in directly and create your free account to start exploring by yourself, please jump in to sign up page:
Create new landing page
The following are the main titles of the above video tutorial:
Wait..
Before proceed reading, Don't forget to Follow us:
It means alot to us if you subscribe to our YouTube channel.
-
Adding title and describtion to your landing page.
-
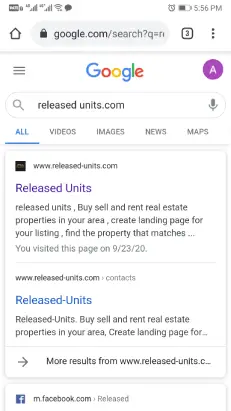
In your browser, search for "Released units.com".
-
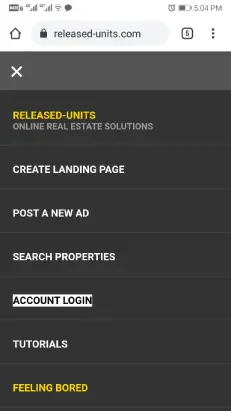
In “released units .com” home page, open the menu from the menu icon on the top left corner, then click on Create landing page button.
-
Alternatively, you can simply click on the Create landing page for your listing in the home page.
-
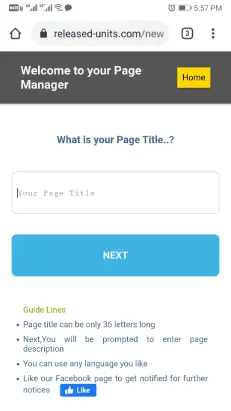
Let's start by typing in your page title, then click “Next”.
-
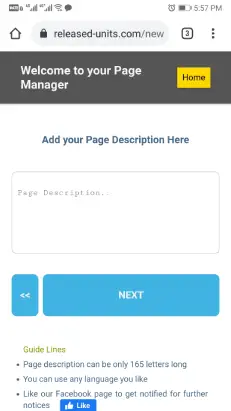
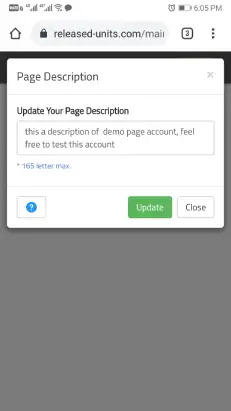
Next, start typing your page description,this description will appear right under the page title and logo of your landing page.
try to insert the keywords naturally throughout the page title and description to get the attention of search engines.
-
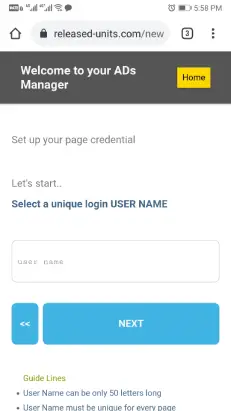
Next, you need to select a user name for this page account.
each page you create should have a unique user name.
do not worry, user name will not appear in any position on your landing page.
-
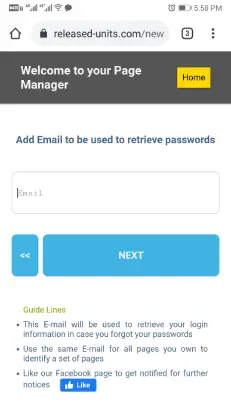
Next, insert your email address for this page account.
it is important to use the correct email address to be able to retrieve account password in case you forget it.
also try to use the same email address for each page you create, this will allow you to manage all your landing pages from the same control panel, as we will see later on this video.
-
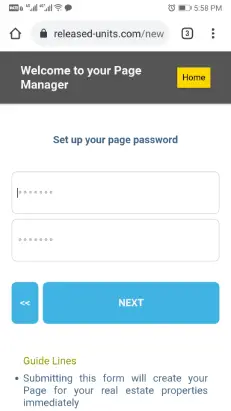
Next, choose a password for your landing page account.
-
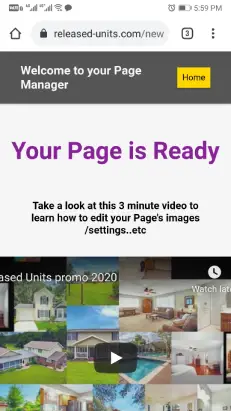
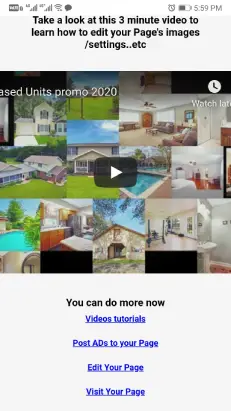
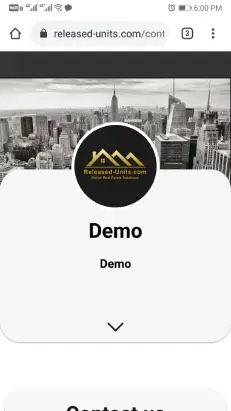
That is it, congratulations, your page is ready.
-
Scroll down, then click "Visit your page" to see it.
-
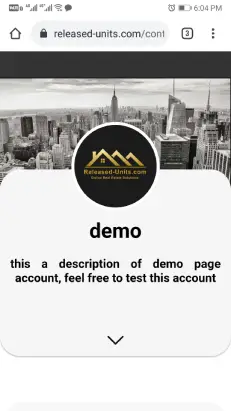
Now you see the landing page you just created, with your title and description, but still have the default logo and image.
-
Next, you will learn how to edit your landing page title and description.
-
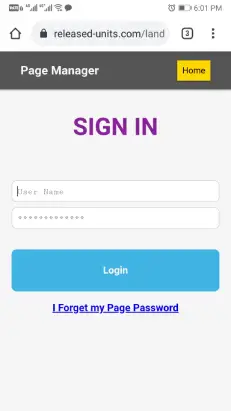
Login to your page account from the menu in the home page.
-
Start typing your page user name and password.
-
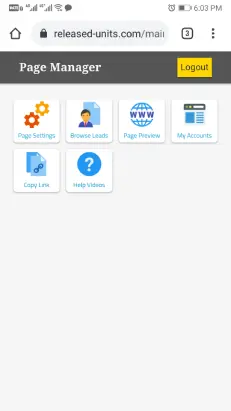
On successful login, you will be directed to your landing page control panel.
-
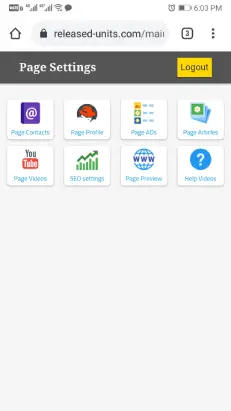
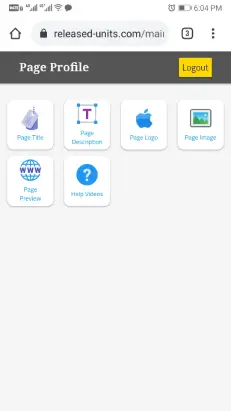
Click on “Page setting”, then choose “Page profile”.
-
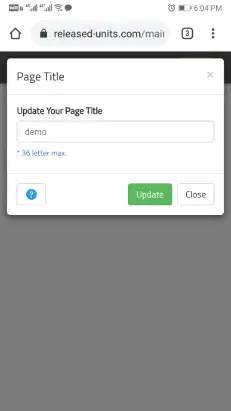
In page profile setting, select "page title".
-
Now edit the title as you need.
-
You can re-visit your page by clicking on "Page preview" icon.
-
Now you see that your page title has changed as you requested.
-
In the same way you can edit your landing page description by clicking on "Page description" icon in your control panel.
-
-
Linking your landing page to your Facebook and YouTube channel.
-
From your toolbar on your Facebook page, select "more" button.
-
Scroll down the menu items to find "copy page link" button.
-
Copy your Facebook page link, then return to your control panel.
-
From your page setting, select "Page contacts" icon.
-
Select "FACEBOOK page".
-
Now paste the link you copied to this empty field, then click "Update".
-
Go to your page by clicking on "Page preview" button.
-
Now you see the “Facebook icon” appears on the header bar of your landing page.
-
Your visitors now are able to visit your Facebook page by clicking this new icon.
-
In the same way you can add another icon for your YouTube channel.
-
Go to your YouTube channel, then click "Share" from the menu items on the top right corner.
-
Select "copy link".
-
Return to your control panel, the click on "YouTube channel" icon.
-
Paste your copied channel link to the empty field on the popup window.
-
Click "Update".
-
Adding WhatsApp button to your real estate landing page.
-
If not logged in, Login to your page account "released units" website home page.
-
Click "Page setting", then "page contacts".
-
Choose "WhatsApp" icon.
-
Now enter your WhatsApp number in the popup window empty field, then click "Update".
-
Go to your page by clicking on "Page preview" button.
-
Now you see a nice flashing “WhatsApp" icon on your landing page header.
-
Your page visitors will start chatting with you directly when clicking on this new icon, in addition, they will get a predefined message to let you know that they are being directed from your landing page.
-
Linking your real estate landing page to your LINKEDIN profile.
-
To copy your "LinkedIn profile URL", try sharing it by email so you can select the URL as shown in the video.
-
Now discard this email, actually you do not want to send it.
-
Return to your control panel, the click on "LinkedIn profile" icon.
-
Now paste the copied URL to the empty field on the popup window, then click "Update".
-
Go to your page by clicking on "Page preview" button.
-
Now you see "LinkedIn" icons appears on your landing page.
-
Adding your phone number to your real estate landing page.
-
If not logged in, Login to your page account "Released units" website home page.
-
Click "Page setting", then "Page contacts".
-
Choose "Mobile" icon.
-
Now enter your phone number in the empty field on the popup window, then click "Update".
-
Go to your page by clicking on "Page preview" button.
-
Now you see a "Click to call" icon appears on your landing page top bar.
-
Set up contact-us form of your landing page.
-
Return back to your control panel.
-
From your page contact setting, click "Email".
-
Now enter your email address to start receiving your visitor’s messages.
-
Click "Update" then "page preview".
-
Let'S test the contact form.
-
Notice that when a visitor submits a new message he will be redirected to "Message received" welcoming page, with a nice message to encourage him to like your Facebook page.
-
You can check now your inbox for the received message.
-
Now i will submit another test message, to show you another nice feature on your control panel.
-
By submitting this new message, you should have to emails on your inbox.
-
Now return to your control panel, or login if you are not logged in.
-
From the main page select "brows leads".
-
As you can see now, the control panel keeps record of your client’s messages and contacts for you to check later in a form of lead cards.
-
Now you can browse your leads in the go with your mobile phone, check their messages and contacts.
-
Try clicking "Browse leads" from your desktop, it will opens an editable table sorting your client messages with more features, like adding clients manually , edit your clients contact, remove client record , you can also update the statues of your client request, these are better features to manage your clients requests.
-
Hiding unwanted icons from your landing page top bar.
-
Return to your page control panel.
-
From "page setting" click "Page contacts", then select the contact type you want to remove.
-
By erasing its corresponding link, it's icon will disappear from your landing page.
-
As you see "LINKEDIN" icon has been removed as we erased its link.
-
How to find video tutorials for each step.
-
Clicking on the "Help" icon of any popup window will toggle a video tutorial on the same window to show you this specific item as step by step.
-
Click on the "Help" icon again to toggle the help video off.
-
Different ways to copy your page URL, to start share or use it on your campaign.
-
Each page you create will have a unique, search engine friendly URL.
-
It mainly consists of the page title of your landing page.
-
You can simply copy this link from your browser.
-
Or use the integrated "share" button in your browser menu to share it directly on social media.
-
Or using the "copy link" button on your device.
-
You can also Login to your control panel, then click on "My accounts" icon.This will open a badge for every page you create @ "Released units" sharing the same email address.
-
Now we only have one page and its user name account is "test".
-
Clicking visit will direct you to this specific page.
-
Clicking "Copy link" will copy its URL to the clipboard.
-
Also, you can find a "Copy link" icon on your control panel main menu, use it to copy your landing page directly to the clipboard.
This the end of this tutorial, hope you enjoyed it.
In the next tutorial, we will learn how to add advertisements section to your landing page, so you will visitors will be able to scroll through your properties and Advertisements.